©2021 Reporters Post24. All Rights Reserved.
A lot of people are installing the preview build of Windows 11 just to see how it looks and feels. However, after a few hours or days, you may be thinking “what did I get myself into?” It’s a beta OS so there can be bugs. Or perhaps you don’t like some of the new UI elements like the obtrusive search box or the rounded corners.
Fortunately, if you want to stick with Windows 11, there are some tweaks you can make to bring it more in line with Windows 10. For example, you can make a registry tweak that lets you have the Windows 10 File Explorer in Windows 11. However, if you want to rollback to Windows 10, that’s possible too, provided that you installed Windows 11 within the last 10 days.
After 10 days, Windows is likely to purge the old OS files, making it impossible to do a rollback, though reinstalling Windows 10 is always an option. We’ve seen a video which suggests that renaming the C:\Windows.old directory to C:\Windows.notold and then changing the name back to C:\WIndows.old could allow you to extend your Windows 11 test beyond 10 days, but you would have had to have done the first renaming within your initial 10-day window.
So, assuming you are within the timeframe, here’s how to uninstall Windows 11 and roll back to Windows 10.
How to Uninstall Windows 11
1. Navigate to Settings->System->Recovery. You can launch Settings from the Start menu and then you’ll find Recovery on the list of submenus.


3. Check off one or more reasons for your uninstall when prompted.

4. Click “No, thanks” when asked to check for updates instead of rolling back. Microsoft would love to keep you on Windows 11, but if your mind is made up, it’s made up.

5. Click Next.

6. Click Next again when warned that you need to remember your password from Windows 10. This should go without saying.

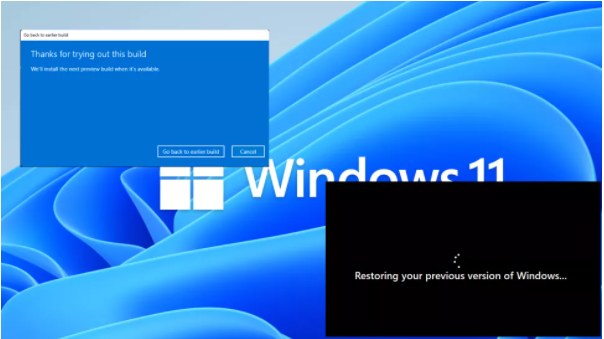
7. Click “Go back to earlier build.”

The system will now restart and go through a restoration process that should take a few minutes.

When that completes, you’re back on Windows 10. However, if our experience is any guide, Windows will try to install Windows 11 Preview again right away, taking you back to the place you just left. Obviously, you don’t want that.
8. Navigate to Settings->Update & Security->Windows Insider program.
9. Toggle “stop getting preview builds” to on.

The menu should refresh itself and show a “Restart now” button. If it does not, click through to another submenu and then return to the Windows Insider Program submenu.
10. Click Restart now.

11. Ensure that your Windows 10 is now unenrolled from the Insider Program. You can do this by navigating to Settings->Update & Security->Windows Insider program and making sure you see the “Get started” button.

What if Windows 10 Tries to Update to Windows 11 Anyway?
So you’ve left the Insider Program, but perhaps Windows was in the middle of downloading a Windows 11 preview build when you changed your Insider setting. Unfortunately, it may not stop the download / install process and will ask you to “Restart to install the newest Windows feature update.” At least, that’s what happened to us when we were writing this tutorial. Don’t restart right away.

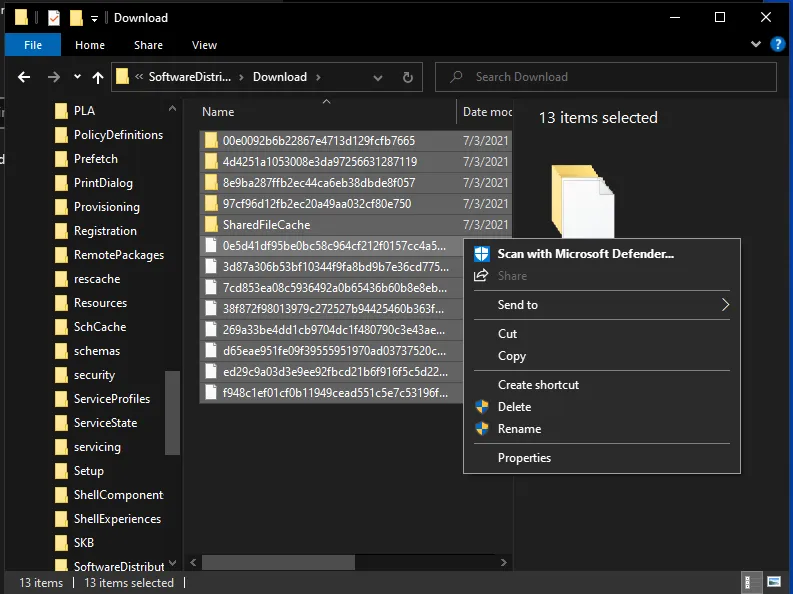
Instead, you can get rid of the downloaded Windows 11 update files, before rebooting by deleting all the files in the C:\Windows\SoftwareDistribution\Download folder. We recommend hitting Shift + Delete after highlighting them so they are permanently deleted and not just moved to the recycle bin. Note also that you will be asked for administrative permission to delete these files and, because there could be more than 9GB of files there, it will take some time.
Select “Update and Restart” from your power menu so that Windows will attempt to use the updates and see that the files are no longer there. If that doesn’t work, try using the Disk Cleanup app and clicking on “Clean up system files” before you reboot again. Provided that you really left the Insider program, it should stop trying to install Windows 11.
If you want to try Windows 11 again in the future, just return to this menu and click the “Get started” button.
Source: www.tomshardware.com