©2021 Reporters Post24. All Rights Reserved.
What Is a DMARC Record + How to Add One to Your DNS [Easy]
Do you want to create a DMARC record DNS?
A DMARC record DNSprovides important instructions for how messages failing email authentication should be handled by mailing servers.
In this article, we’ll explain what a DMARC record is with examples, and show you how to add a DMARC record to your DNS.
To navigate this post faster, you can use the quick links below to jump to any specific section.
What Is a DMARC Record?
A DMARC record is a TXT record that contains instructions for how an email server should handle an email that fails authentication. Using DMARC records, you can control if email receivers should reject, quarantine, or do nothing with a suspicious email.
It’s important to create DMARC record because it helps servers distinguish legitimate emails from fake ones. As a result, it minimizes cyber threats like phishing, email spoofing, and CEO fraud. This is why we strongly recommend creating a DMARC record to ensure better email security.
DMARC Record Example
A typical DMARC record contains at least three important components (or tag-value pairs). Consider this sample DMARC record:
v=DMARC1; p=reject; rua=mailto:dmarc@yourdomain.com
Here, we have three tags: v, p, and rua which have the values DMARC1, reject, and mailto:dmarc@yourdomain.com.
The v tag specifies the version of DMARC, the p tag is the policy (or the action to perform if email fails DMARC checks), and the rua tag is the email address where you want to receive DMARC aggregate reports at.
In the example above, the p tag has the value reject. In other words, the policy defined here is to reject a message when a message fails authentication. Here’s what the 3 possible DMARC policies mean:
- None: No action is taken for messages failing DMARC, but aggregate reports will still be sent to you so you can monitor what’s happening to your emails. You may get a ‘DMARC policy not enabled” error if the policy is set to none.
- Quarantine: Messages failing DMARC checks are put in the junk folder of the receivers.
- Reject: All email messages failing authentication are completely rejected, never reaching your recipient.
There are various other option tags that you can use like pct and ruf. However, for simplicity’s sake, we won’t include these in our examples. You can still set up your DMARC record with just the 3 tags mentioned above.
If you’re using WP Mail SMTP to handle your WordPress emails, it’ll tell you if DMARC isn’t set up correctly on your domain. You might also see an error like ‘No DMARC Record Found’.
The steps below will help you to resolve the issue and build DMARC record just the way it’s supposed to be.
How to Create a DMARC Record
Let’s step through the process of setting up a DMARC record on your domain. We’re going to copy a generic record that will work with any host.
Check Your DNS With a DMARC Analyzer
If you’re not sure whether you have a DMARC txt record set up on your site, you can use a DMARC checker like MXToolbox to scan your DNS records.
Type your domain name into the field and click DMARC Lookup.

If you don’t have DMARC set up, the DMARC analyzer will show a failure message.

If you’re using WP Mail SMTP, you can also check if DMARC is working by sending a test email. In the WordPress dashboard, click WP Mail SMTP, then Settings, and then the Email Test tab.
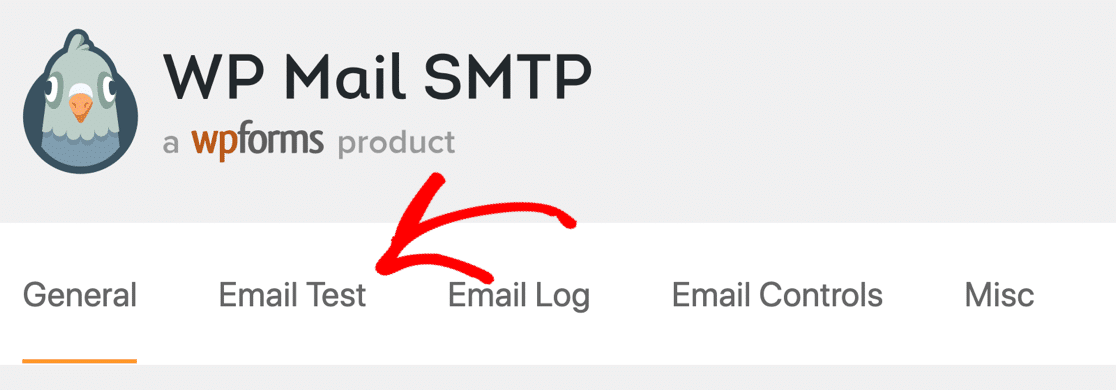
Send a test email using the form on the Email Test page.
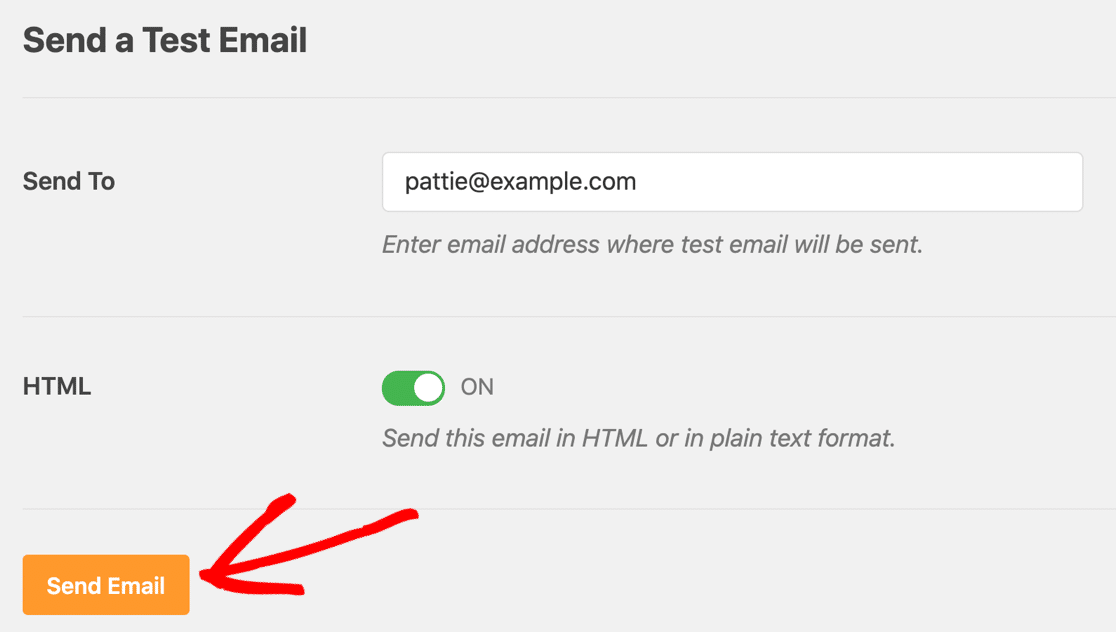
After sending the email, scroll down and check to see if there’s a warning message.

Scroll down a little further. Do you see a warning that says It doesn’t look like DMARC is set up for your domain?

This means that:
- You don’t have a DMARC record in your DNS zone
- Your DMARC record hasn’t propagated yet
- The DMARC record might not be formatted correctly.
Let’s log in and add that DMARC record next.
Edit Your Domain’s DNS Records
Now we’re going to edit the DNS for your domain and add a DMARC record.
DNS is a set of instructions that tell servers where to find your site content, email mailbox, and more. To edit your DNS, you (or the domain owner) need to log in to the provider handling the DNS zone for your domain.
If you’re not sure where it is, you can try:
- Your web hosting control panel: If you purchased your domain and hosting as a package, your DNS is probably handled by your web hosting company. You’ll want to log into your hosting control panel and look for a menu called DNS or DNS Zone.
- Your DNS registrar: If you purchased your domain by itself, the DNS is probably managed by the company you bought it from.
- Your CDN provider: If you’re using a CDN like Cloudflare, your DNS records will be hosted within the CDN settings.
In this example, we’ll show you how to create a DMARC record manually in Cloudflare.

The DMARC configuration steps are very similar for other domain registrars or hosts, including:
- GoDaddy
- SiteGround
- Bluehost
When you open up your DNS, double-check that you don’t already have any DMARC records set up.
You can’t have more than 1 DMARC record in your DNS. But don’t worry: our example record will cover all of the subdomains under your domain, and all of the email addresses you send mail from.
Assuming you don’t, let’s move on and add a DMARC TXT record.
Create Your New DMARC TXT Record
We’ve got 2 different methods to share in this section: copying and pasting a DMARC record, which works with any host, or generating a record in Cloudflare.
Option 1: Copy and Paste Our DMARC Record (Any Host)
It’s easy to add a DMARC record manually using our example. There’s no need to use a DMARC generator.
On your registrar’s DNS record screen, click Add record to create a DMARC record. We’ll use Cloudflare in this example.

A DMARC record is a TXT record starting with _dmarc. So in the Type dropdown, select TXT.

In the Name field, type _dmarc. with the period (dot) at the end. Some hosts don’t need the period, so they’ll remove it or show an error. In that case, you can safely use _dmarc it without the period.
In the large field in the DNS record, paste in this DMARC record example.
v=DMARC1; p=none; fo=1; rua=mailto:me@example.com
Here’s what this rule does:
- We’re using
p=nonebecause it’s the least restrictive setting. You’ll still get email reports if there’s an issue with your DNS, but it’s unlikely to affect your own emails from being delivered. If you start to get suspicious DMARC reports, you could change this part of the rule top=quarantine. - Be sure to change the
rua=mailto:address. It should ideally be set to the email address that your mailer service provides in its documentation. If it doesn’t provide one, you can use an email address at your own domain. - If the authentication method (DKIM or SPF) is unaligned with your DMARC record, the
fo=1rule will generate forensic reports containing details of the event. - In basic terms, the TTL (Time to Live) setting is like an expiration date for your DNS. We recommend leaving the TTL setting on Auto, which is typically 4 hours. The setting isn’t crucial, so you can safely select 24 hours or 14400 if that’s the only option you have.
Some providers may ask for an alignment rule. It’s OK to exclude that since it’s not required for your DMARC text record to work.
So after pasting in the rule, here’s our finished DMARC record:

Save your new DMARC rule to add the new record to your DNS.
If you already had a DMARC rule in your DNS, check the formatting carefully. Pay attention to the Name field; if you use @ or your domain name in the Name field, it won’t work.
Option 2: Generate a DMARC Record (Cloudflare Only)
If you prefer, you can generate a DMARC record if you’re a Cloudflare user. Cloudflare has DNS record generators for SPF, DKIM, and DMARC.
In this section, we’ll focus on generating a DMARC record in your account. This generates a record just like the one in the previous section, but you might prefer to use this method if you’re not comfortable editing your DNS records directly.
To start, click on DNS on the left-hand side of your Cloudflare dashboard.
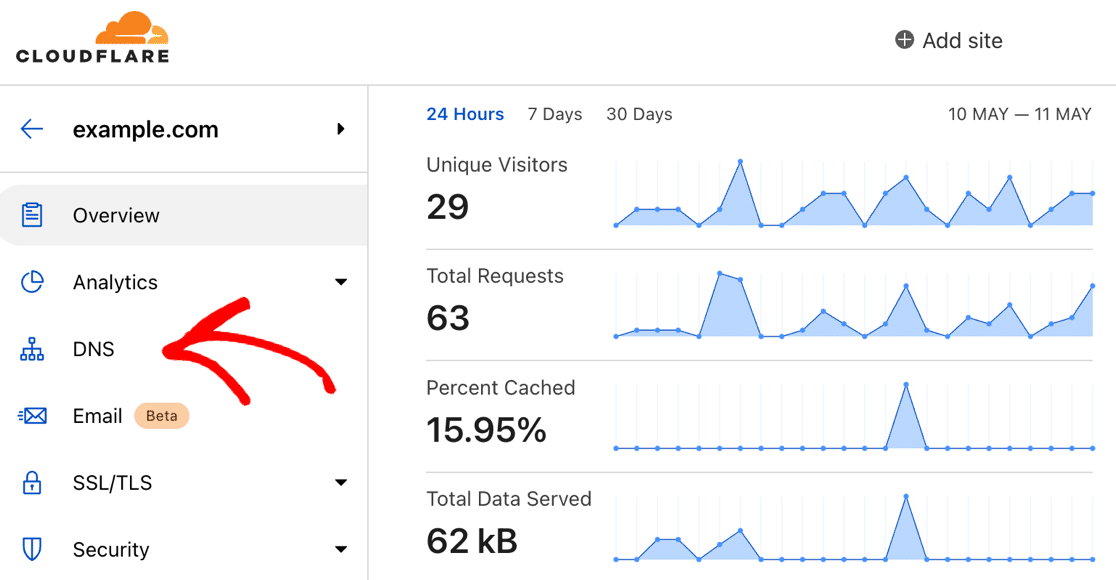
On the DNS page, scroll all the way down until you see Email Security. Click the blue Configure button to continue.

Next, you’ll see options to generate a DKIM, SPF, or DMARC record. Go ahead and click on Create Record in the DMARC section.
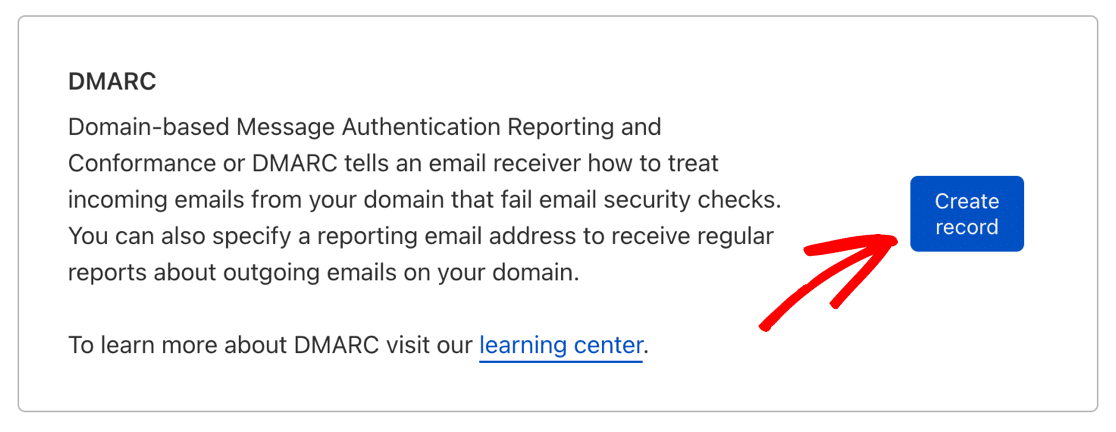
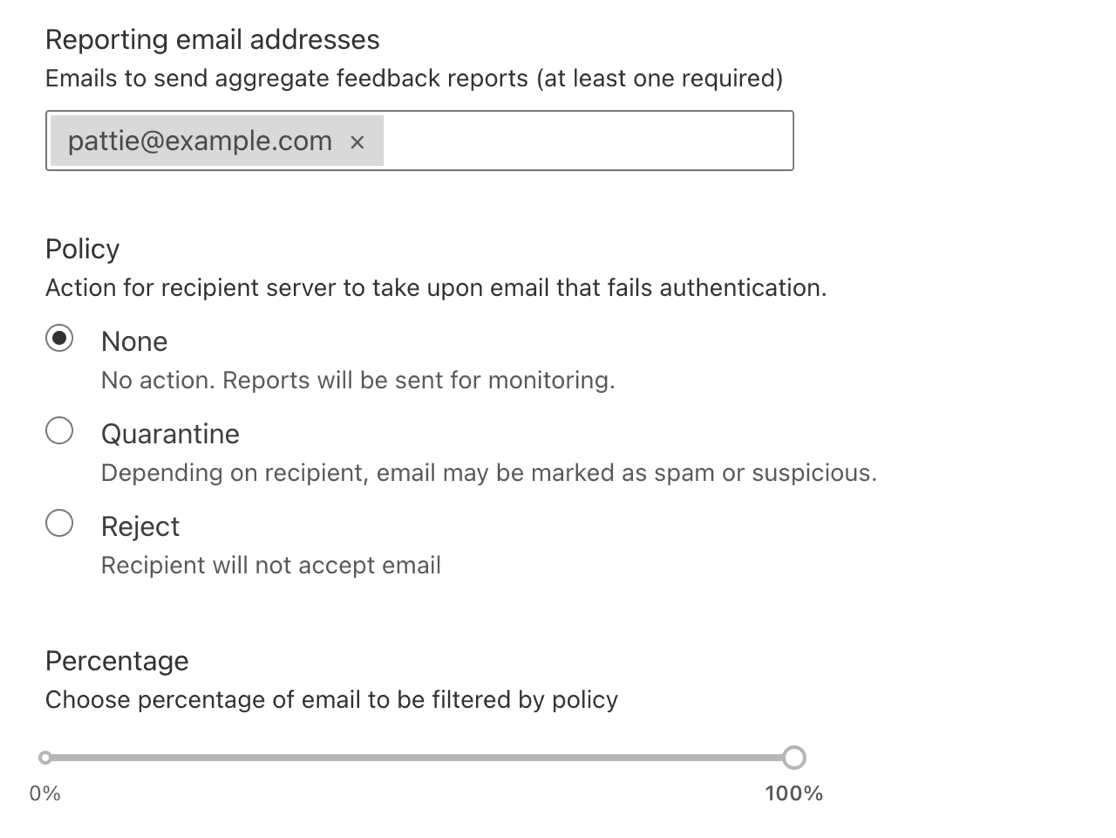
Now you can set up your DMARC record in the same way that we created one manually. Cloudflare provides a simple interface for you to set:
- Reporting Email Addresses, which are the email addresses that’ll receive DMARC reports
- The specific Policy you want to use – None, Quarantine, or Reject
- The Percentage of emails you want to filter – you can leave this on 100% unless you have a reason to change it.
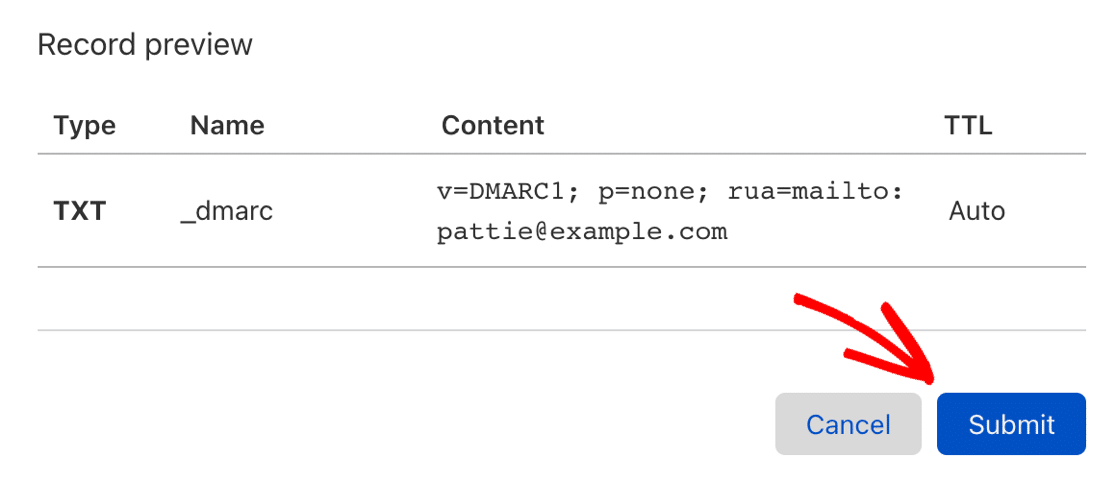
When you’re happy with the finished DMARC record, click Submit.
Wait For Your DMARC Record to Propagate
Whenever you make changes to your site’s DNS, you’ll need to wait up to 48 hours for the changes to take effect. If you’re using Cloudflare, you’ll usually find that the changes take place within a few minutes.
When the change has propagated, go back to a web-based DMARC checker like MXToolbox. Check again using its DMARC tool.
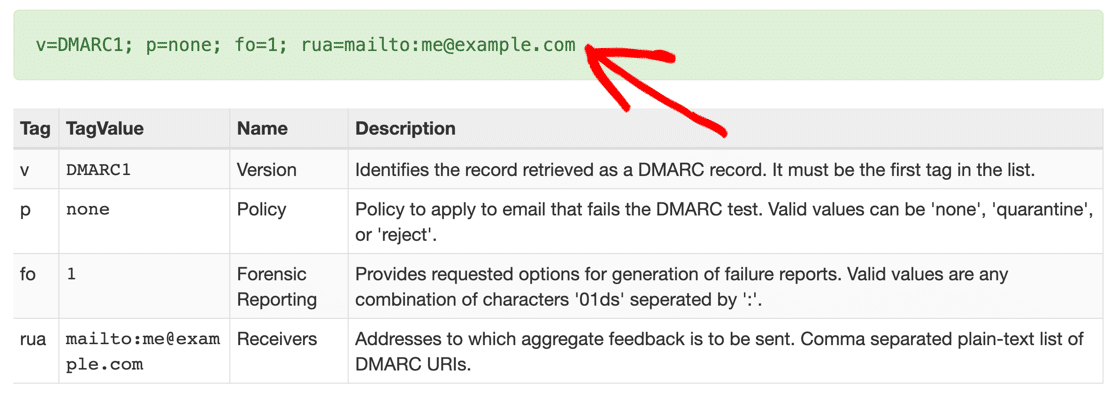
Your DMARC rule should show up in a green bar so that you know it’s working.
You can also use WP Mail SMTP to send another test email from WordPress. This will automatically run a fresh check on your DNS and look for your DMARC record configuration.
If you added everything correctly, you’ll now see a pass message like this:

Next, we’ll show you how to generate a DMARC record in Cloudflare if you prefer to do that.
And that’s it! You’ve now successfully added a DMARC record to your DNS.
What Does DMARC Stand For?
DMARC stands for Domain-based Message Authentication, Reporting, and Conformance.
How Does DMARC Work?
The DMARC protocol checks the SPF and DKIM records for your domain. If the email server can’t find any SPF or DKIM records, it looks at DMARC to figure out what to do with the outbound mail.
Based on the content of the DMARC record, the server might:
- Quarantine your emails
- Send them to the junk or spam folder
- Reject them altogether.
That’s why it’s best to set up DKIM, SPF, and DMARC together. That way, the email server can easily separate emails from a legitimate sender from any spam messages that are sent using your domain.
DMARC has other functions too. For example, it generates technical reports about the actions it’s taken. You might receive these reports if you use your email address in the DMARC rule.
In most cases, you don’t need to worry about DMARC reports unless you have other issues with spam or email deliverability.
Are DMARC Records Required?
No, DMARC records are not required for you to send emails. However, it’s strongly recommended that you add DMARC records to your DNS. This is because DMARC records protect your users from dangerous activities like phishing and unauthorized use of your email domain.
Who Can Use DMARC Records?
Anyone who owns a domain name can use DMARC to verify that the emails they send are genuine. There is no charge to use it.
Some third-party providers will say that it isn’t worth using DMARC on a small site. But we always recommend that you set up DMARC anyway because it helps to stop WordPress emails from going to spam.
Where Are DMARC Records Stored?
DMARC records are stored in your DNS in the form of a TXT record. Your DNS also stores SPF and DKIM records. Together, these DNS records protect you from email domain spoofing and instruct mailing servers what to do if an unauthenticated email is detected from your domain.
How Many DMARC Records Can I Have?
You can have only one DMARC record for one domain or subdomain. If you have multiple DMARC records at the same domain level, it can confuse mailing servers. This typically means that your DMARC records won’t be able to enforce any rules and policies that you may have defined for handling unauthenticated emails.
Do I Need to Create a DMARC Record?
Yes, we recommend that you add a DMARC record if you’re using your domain to send email through a separate email service or provider. For example, if you want to use Sendinblue, you’d need to create a DMARC record on your domain for that.
As a general guide, you don’t need a DMARC record if you’re sending emails from a domain you don’t control, like a Gmail email address.
Can You Create a DMARC Record Without DKIM?
Yes, you can. But we recommend that you set up DMARC, SKIM, and SPF records if your email provider requires them. Not all do, so you’ll want to check the setup steps in their documentation.
Why Did My DMARC Record Check Fail?
If you’ve added your DMARC record and it still isn’t showing up, it may not have propagated. You might see the message ‘no DMARC record found’.
It’s best to wait for 24 hours for a DNS change to propagate before contacting support.
Do I Need to Use a DMARC Record Generator?
No. In most cases, our DNS example will work on your domain. Just be sure to change the email address in our rule before saving it.
If your provider gives different instructions, it’s best to use their DMARC record instead of our example.
Should I Add a PTR Record?
You definitely need a PTR record, but it’s unlikely that you’ll need to create this yourself. For more information, check out our article: What Is a DNS PTR Record (and Do I Need One?). It explains what a PTR does and how you can add one to your DNS.
What Happens If There Is No DMARC Record?
While you can still send emails without a DMARC record, it increases the risk of spoofing crimes. Bad actors on the web can spoof your branded email address to run fraudulent schemes against your customers. A DMARC record offers protection against these kinds of threats.
This is why it’s strongly recommended to add a DMARC record for your domain.


