©2021 Reporters Post24. All Rights Reserved.
Since the last few years, Google and Microsoft are putting in huge efforts to improve user privacy, especially after Apple made privacy a selling point. Google brought the option to change system-wide DNS settings with Android 9, and Microsoft added the option on Windows 10 in 2020. Even Mozilla now enables DNS over HTTPS by default in its web browser. So if you want to protect your privacy on the web, go ahead and turn on DNS over HTTPS on Windows 11. It’s a system-wide toggle, so all communication between your PC and the DNS server will be encrypted. So without any delay, let’s check out what it is and the steps to enable it.
Turn On DNS over HTTPS on Windows 11 (2021)
In this article, we have mentioned the steps to turn on DNS over HTTPS (DoH), along with an explainer on what DoH is and why you should enable it on your Windows 11 computer.
What is DNS over HTTPS and Why You Should Enable It on Windows 11?
If you have no prior knowledge of DNS over HTTPS, there is nothing to worry about. Here, we give you a brief explainer about DoH and make a case for why you should enable it.
When you visit a website, your computer does not know the domain name (like google.com) of the website. It asks a DNS server using the domain/ IP address of the website (for example – 142.250.196.78 for google.com) and asks it to point to the correct domain name and then fetches the result. This communication between your computer and the DNS server has traditionally remained unencrypted. That is changing now.

To make it clear, whatever you do on a website, like browsing the website or performing a transaction, remains encrypted given that it’s an HTTPS website. It means that no one, not even the ISP knows what you did on the website. However, DNS queries are largely unencrypted, and that means your ISP or anyone in the local network can at least know which website you visited.
So now, to bring encryption to DNS queries, the DNS over HTTPS feature has been introduced. Basically, even while fetching the domain name from the DNS server, your queries will be encrypted using the HTTPS protocol.
Not just that, with system-wide DNS over HTTPS, all apps and programs on Windows 11 will also use DoH to talk to the DNS. So not only web browsers, the DNS communication on your entire PC will be protected. So if you want to enable DNS over HTTPS on your Windows 11 PC, follow the steps below.
How to Turn On DNS over HTTPS on Windows 11 [Easiest Method
1. Open the Settings app and move to the “Network & internet” section from the left sidebar. Then, click on “Wi-Fi” or “Ethernet” depending on your internet connection on the right pane.
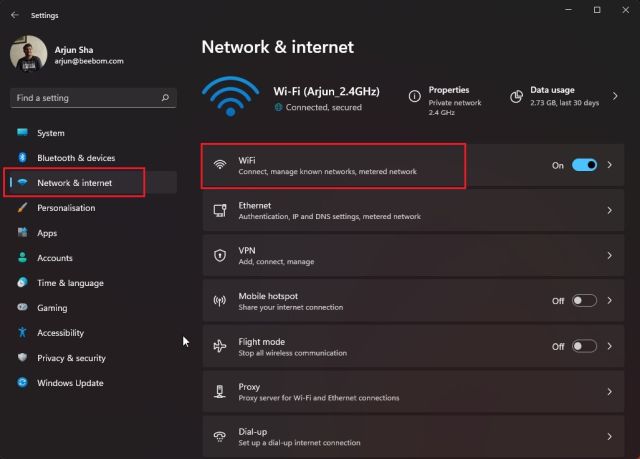
2. Next, move to “Hardware properties“.
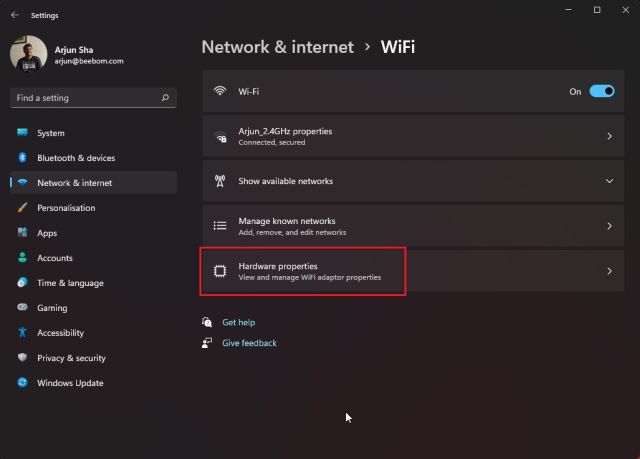
3. Here, click on “Edit” next to “DNS server assignment”.
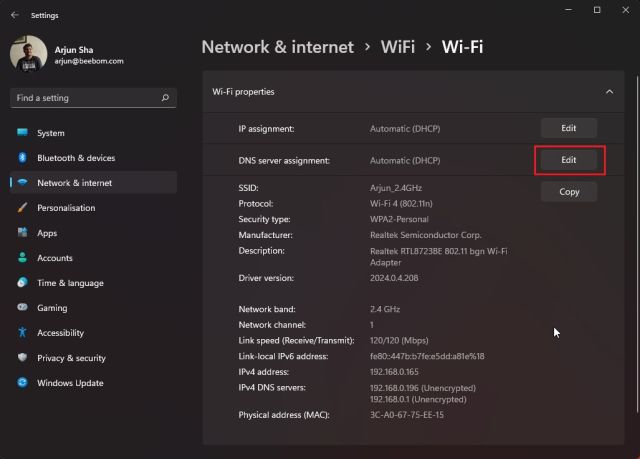
4. From the drop-down menu at the top, choose “Manual” and turn on “IPv4”.
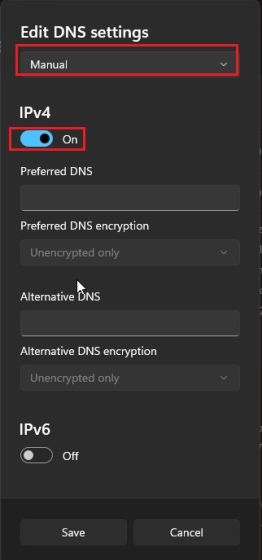
5. Under the Preferred and Alternative DNS fields, enter your choice of DNS. You can go through our list of best DNS servers from the linked article. We are using Google’s DNS server, which is 8.8.8.8 and alternate DNS 8.8.4.4. There are also popular alternatives like Cloudflare and OpenDNS to choose from.
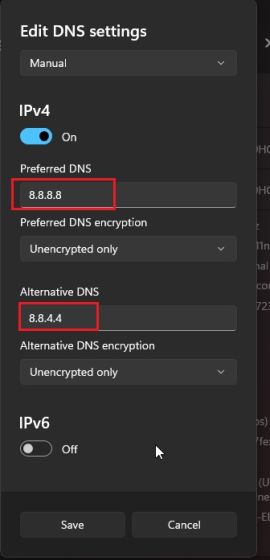
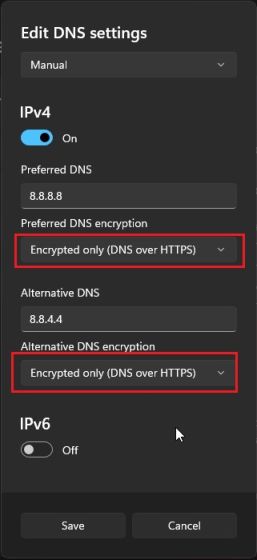
6. Finally, to turn on DNS over HTTPS on Windows 11, click on the drop-down menu under “Preferred DNS encryption” and choose the “Encrypted only (DNS over HTTPS)” option. Follow the same steps for “Alternative DNS encryption”. You don’t need to do anything for IPv6.
7. After that, click on “Save” to save the changes, and you are done.
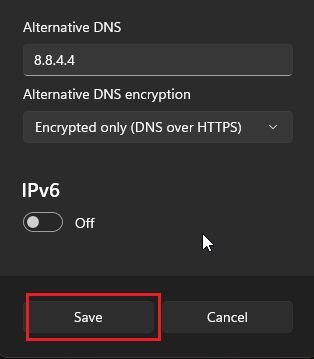
You have successfully enabled DNS over HTTPS on your Windows 11 PC. All communication between your computer and the DNS server will now be encrypted, and no one will be to access your DNS queries.
Secure Web Communication on Windows 11 with DNS over HTTPS
So that is how you can enable DNS over HTTPS on Windows 11 to encrypt the DNS queries from your computer. As you might know, web surveillance is increasing day by day, and it’s absolutely essential for users to guard their privacy, more so when it’s something as basic as a DNS query. Anyway, that is all from us. In case you are facing the network discovery issue on Windows 11, follow our linked guide to fix the issue right away. And if you have any questions, comment down below and let us know.
Source: https://beebom.com


